JavaScript plays an important role in user experience, providing interactivity, Ajax-driven data, form validation, and much more.
Writing the JavaScript necessary for managing a site feature like a content slider, a REST API, or an Ajax shopping cart is not necessarily difficult, but it is time consuming. You have to decide on an approach, write the code, test it across browsers, refactor it to allow for browser differences, and do more testing.
JavaScript frameworks or libraries can make development move much more rapidly, providing functions or method for many common (or uncommon) tasks, and ensuring that everything works regardless of the user's client.
In this article, you find a listing of many excellent JavaScript libraries that...
Sunday, October 30, 2011
JavaScript Frameworks Galore
Rendering PDFs with pdf.js using HTML5 and JavaScript

What is new in ASP.NET 4.5

Building Apps with HTML5: What You Need to Know
Learn HTML5 in 5 Minutes!
Wednesday, October 26, 2011
E-Commerce Microdata Best Practices
 SEO for e-commerce sites is like playing on a teeter-totter with all the kids at the playground, and search engines are the fulcrum. Whether the site is geared toward lead generation or B2C sales, the goal of most e-commerce SEO campaigns is to stomp the competition in organic search rankings. Emerging technologies have brought forth microdata with the release of HTML5.
The concept of microdata is a new for SEO professionals, which may give e-commerce clients the edge over competition. This little-known practice will give search engines an explanation of certain elements on a webpage, building trust for that page.
Microdata is a very simple HTML markup that can be used to define dates, prices, locations, descriptions, products, etc … Google, Bing and Yahoo partnered to create Schema.org – a mutually developed resource defining accepted practices in regards to microdata. According to the Bing Webmaster Center Blog, Bing places a lot of weight on the presence of microdata in search engine results. Rumor also has it that Google may eventually replace Google Base with microdata for product searches. Whether the purpose of your website is to sell work gloves to consumers or generate B2B leads for moisture wicking shirts, microdata is something that should be implemented for all product pages on e-commerce websites.
Microdata Compatibility:
Setting up pages to be microdata-compatible is very easy. In most cases, it will only require changing the doctype to support HTML5. Depending on the size of your e-commerce site, this could take anywhere from two minutes to two days. There might be some problems that occur as a result of changing the doctype. This is a rare circumstance, but it is very possible. The doctype for HTML5 is . The doctype markup will be located on the first line of each html file. After changing the doctype, test the page in different browsers to make sure none of the page elements were affected by the alteration.
Product Page Elements:
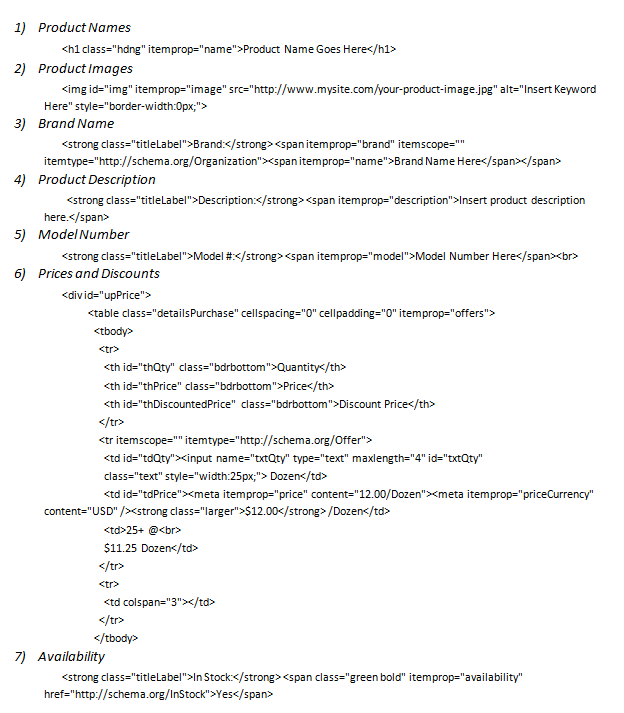
Now that the compatibility is set up for the pages, you will need to do an audit on product pages to ensure all the product elements are present. Inserting product information elements is not only beneficial for SEO, but also for usability purposes. Each product page should include: product name, brand, model, description, price, availability, aggregate review score and quantity, related products, and product reviews. Microdata can be added to each of these elements, making them more visible and understandable to search engines.
Wireframing and Element Placement on Product Pages:
Product page layouts have an immeasurable influence on conversion rates. Before spending countless hours on page designs, create a few wireframes, depicting possible layouts for product pages. A suitable product page should be easy for consumers to gather all the information needed to make an informed purchase. Meanwhile, the pages also must possess the proper hierarchal content structure for search engines to understand the importance of each element on the page. If you run a large e-commerce site, it may be beneficial to try a few different page designs, and run conversion testing to identify the best-performing layout.
Product names should always be contained within an h1 tag at the top of the page. Images of the product should always be located under the product name. Remember to practice image optimization for all product images. Somewhere near the image, include the brand name, product description, price, availability and aggregate product reviews. Toward the bottom of the page, add a “featured products” and “product reviews” sections.
Markup Declarations:
Prior to marking up any product elements, you will need to define that everything contained in marked up html blocks is product information. Itemscope and itemtype declarations are required on each product page because they define that everything within each designated html block relates to the product. Both declarations are an HTML5 feature, which is why changing the doctype is required. This will tell search engines to parse out the markup as product information. The following markup demonstrates how to set up declarations.
![]()
Marking Up Product Pages:
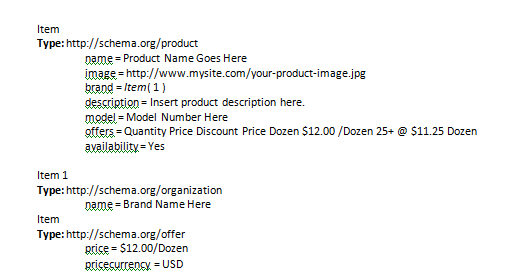
Once you are satisfied with a page layout, you will need to mark up all the elements with microdata. Below is an example of all seven basic product page elements, as well as the Google interpretation. “Product review” and “featured product” markup will be covered later in this article.

Testing Microdata:
Testing the pages after changing the markup is obligatory to ensure that the microdata interprets properly. Google recently came out with this handy rich snippets testing tool to test the interpretation of microdata snippets. Run a test on each page to make sure Google parses the markup properly. The Google Rich Snippets interpretation of this markup looks like this:

Featured Products Markup:
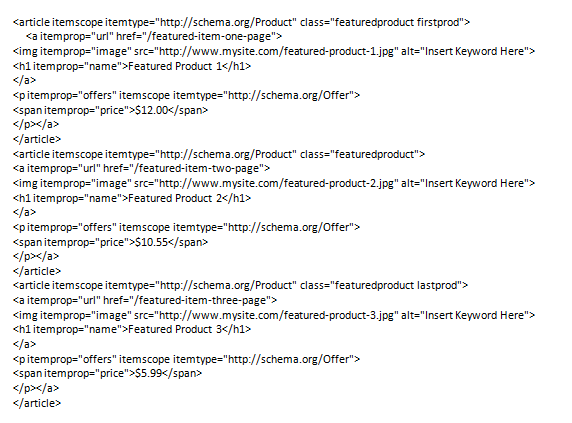
A must-have for improving conversion rates of an e-commerce site is to have a “featured products” section on each product page. Depending on how the website has this section set up, the markup may require alterations. Many websites do featured products in javascript rather than html. Here’s an example of a basic html version of the featured products section.

Product Review Markup:
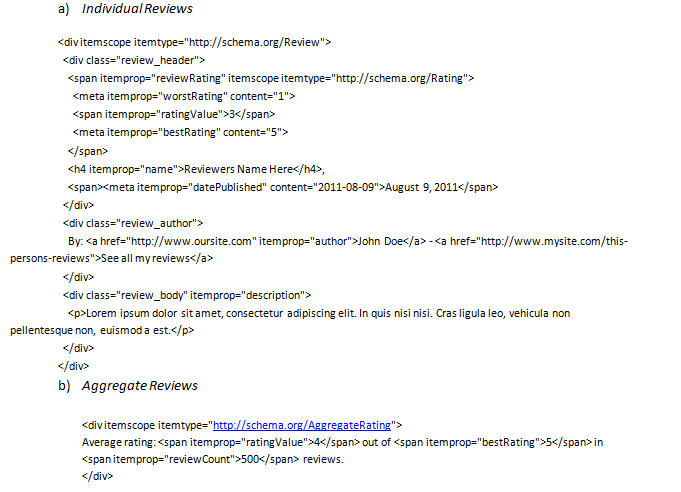
Providing consumer reviews is essential for helping potential customers make informed decisions when purchasing from an e-commerce site. If you recently launched a new line of FR workwear, you will probably want to monitor customer feedback to see if the product needs improvement. In addition to individual product reviews, you will also want to provide an aggregate review rating and total count. This will give consumers an indication of how well other customers rated the product without having to spend time reading all of the reviews. Below is a snippet for individual reviews and aggregate reviews.

Category Page Markup:
Depending on how the website is set up, you may choose to mark up category pages. If you list product information on the category pages, you will want to omit any microdata markup as it may cause a confliction with the product pages. After all, the goal for conversions usually starts with the product pages, so you will want the product page to be the landing page rather than a category page. For a simple category page that lists category names, place each category name in an h1 tag and add the following microdata markup.

Special thanks to Dave Ross of Straight North for providing the microdata markup snippets.
Follow SEJ on Twitter @sejournal
Tuesday, October 25, 2011
A JavaScript Library for Creating Reactive Documents
Tangle is a JavaScript library for creating reactive documents. Your readers can interactively explore possibilities, play with parameters, and see the document update immediately. It is a lightweight library that provides a simple API for tangling up the values in your document. Tangle.js has no dependencies, and works with any JavaScript framework, or none at all.
TangleKit is an optional collection of UI components that let your readers adjust values and visualize the results. You can grab whichever components you want, use them, extend them, modify them, or just learn from them and make your own. TangleKit also includes (and depends on) a few helpful libraries, such as MooTools, sprintf, and BVTouchable.
Requirements: Javascript enabled
Demo: http://worrydream.com/Tangle/
License: MIT License
Related Posts
Sponsors
Professional Web Icons for Your Websites and Applications
Sunday, October 23, 2011
JSON Serialization and Deserialization in ASP.NET
Saturday, October 15, 2011
Developers, UX Is Your Business Too!

Software developers often think the user experience as something better left to either the interaction designers or the visual designers on their teams. In actuality, developers can have profound impacts on the user experience of the products they’re working on. This article will explore some areas of experience design in which the development process has a more direct role. This is not to say that developers can substitute for UX and interaction designers, but they can play a role in making compelling applications.
Limit the User’s Choices
This may sound counterintuitive, but when a user is given too many choices, it makes it harder for the user to make any choices. When faced with an excess of choice, the user might abandon the application altogether, which is certainly not the choice we want them to make....read more
By Chris Griffith
Tuesday, October 11, 2011
Simple, fast and useful MiniProfiler for ASP.NET MVC
MiniProfiler is very lightweight, simple, fast and useful profiler for ASP.NET websites including ASP.NET MVC. It is designed to help you find possible performance issues and have very nice and clear view over each operation that happens in your web applications.
MiniProfiler was created by the Stack Overflow guys for their internal use, but they have put it as an open source project under Apache License 2.0 for all ASP.NET and WCF developers! (Thanks guys!)
To get started using MiniProfiler, you have to install it first.
You have two options available:
Installation
1. Using NuGet Package Manager
- In VS.NET 2010, go to Tools –> Library Package Manager –> Manage NuGet Packages…

Install MiniProfiler.MVC3


Once installation is successful, both MiniProfiler will be ticked.

If you want to use MiniProfiler for Entity Framework too, then install the MiniProfiler.EF too.
2. Install manually from here (you have github clone too)
Setting up
Once you are done with installation, if you have used NuGet manager to install MiniProfiler, you are almost done
The new dlls added by the NuGet are marked:

Besides dlls, there is also a MiniProfiler.cs class inside App_Start folder

The next thing you need to do is to include MiniProfiler in the master layout page. Once you expand the Views –> Shared, you can see that with installing MiniProfiler there is _MINIPROFILER UPDATED Layout.cshtml that is an example master layout regarding how to include MiniProfiler in your Layout page.


Copy the marked line and add it to your actual _Layout.cshtml
In my example:
<!DOCTYPE html>
<html>
<head>
    <title>@ViewBag.Title</title>
    <link href="@Url.Content("~/Content/Site.css")" rel="stylesheet" type="text/css" />
    <script src="@Url.Content("~/Scripts/jquery-1.4.4.min.js")" type="text/javascript"></script>
    @MvcMiniProfiler.MiniProfiler.RenderIncludes()
</head>

<body>
    @RenderBody()
</body>
</html>
Using MiniProfiler
Now, run your application… you can see MiniProfiler is running in the top left corner:


If you want to see what does MiniProfiler includes for us, check View Source in your browser:

If you want to start the mini profiler for specific requests only (e.g. local requests), you can use MiniProfiler.Start() method. The best place to add this is in the Global.asax Application_BeginRequest.
Grouping Profiler Steps
Using MiniProfiler we can group profiling steps very easily. Yep, this might make your code in some segments a bit more dirty, but if you have clean code you should no worry…
To perform grouping by steps in your Controller, first add using MvcMiniprofiler; directive
using MvcMiniProfiler;Create instance of MiniProfiler by adding the MiniProfiler.Current that represents the currently running profiler in the HttpContext
Use the Step() method in using code block to create profiler step.
Example:
Then in my Products ActionResult add the following code:
public ActionResult Products()
{
    List<Product> listProducts = new List<Product>();

    MiniProfiler profiler = MiniProfiler.Current;

    using (profiler.Step("Load Product Items", ProfileLevel.Info))
    {
        System.Threading.Thread.Sleep(1000); //1 second sleep
        listProducts.Add(new Product() { ProductID = 1, Name = "Product 1", Price = 100 });
        listProducts.Add(new Product() { ProductID = 2, Name = "Product 2", Price = 200 });
        listProducts.Add(new Product() { ProductID = 2, Name = "Product 3", Price = 300 });            }

    using (profiler.Step("Add Products to List", ProfileLevel.Info))
    {
        System.Threading.Thread.Sleep(2000); //2 seconds sleep
        ViewBag.Products = listProducts;
    }

    return View();
}
In this example we have two profiler steps: Load Product Items and Add Products to List.
Now add new View to display products list by right clicking somewhere above the code in Products() method and Add View with name Products.
In the view add the following code (just for the demo…):
@{
    ViewBag.Title = "Products";
    Layout = "~/Views/Shared/_Layout.cshtml";
}

<h2>Products</h2>
<p>
    <ul>
        @foreach (var item in ViewBag.Products)
        {
            <li>
                @item.Name ($@item.Price)
            </li>
        }
    </ul>
</p>
Now run the web page and navigate to /Home/Products

once you click the button at the top-left corner you will get this:

Profiling Database Queries
To use MiniProfiler for profiling database queries, first you will need to de-comment one (or both) of the database related line/s inside App_Start/MiniProfiler.cs PreStart() method
//TODO: To profile a standard DbConnection:
// var profiled = new ProfiledDbConnection(cnn, MiniProfiler.Current);

//TODO: If you are profiling EF code first try:
 MiniProfilerEF.Initialize();
In our example I will be using the EF Mini Profiler.
First, I have rewritten the Products method with the following code:
public ActionResult Products()
{
    AdventureWorksEntities context = new AdventureWorksEntities();

    ViewBag.Products = (from p in context.Products
                        join pm in context.ProductModels on p.ProductModelID equals pm.ProductModelID
                        join pmx in context.ProductModelProductDescriptionCultures on pm.ProductModelID equals pmx.ProductModelID
                        join pd in context.ProductDescriptions on pmx.ProductDescriptionID equals pd.ProductDescriptionID
                        select new ProductViewModel
                        {
                            ProductID = p.ProductID,
                            Name = p.Name,
                            Description = pd.Description.Substring(0, 200)
                        });

    return View();
}
I am using AdventureWorks database with EF. I have added one query that joins four tables. Now just run the application.

if we click on 1 sql, the MiniProfiler will give us some detailed info regarding generated SQL query and the time needed to execute and finish

If we have some query that is executing very long or we have multiple queries which create performance issues, MiniProfiler will give us warnings…
For example, lets add loop of executing the above query 50 times
public ActionResult Products()
{
    AdventureWorksEntities context = new AdventureWorksEntities();

    List<ProductViewModel> productList = new List<ProductViewModel>();

    for (int i = 0; i < 50; i++)
    {
        productList.AddRange(from p in context.Products
                       join pm in context.ProductModels on p.ProductModelID equals pm.ProductModelID
                       join pmx in context.ProductModelProductDescriptionCultures on pm.ProductModelID equals pmx.ProductModelID
                       join pd in context.ProductDescriptions on pmx.ProductDescriptionID equals pd.ProductDescriptionID
                       orderby p.Name descending, p.ProductID ascending, pd.Description descending, pd.ModifiedDate descending
                       select new ProductViewModel
                       {
                           ProductID = p.ProductID,
                           Name = p.Name,
                           Description = pd.Description.Substring(0, 200)
                       });
    }

    ViewBag.Products = productList;

    return View();
}
Once we run the app, it will take few seconds to load…

Summary
ASP.NET MVC MiniProfiler is a great tool that you must have in your toolset for building scalable, fast and performance optimized web applications. You can have clear view of what is causing performance issues in your application in almost all levels and layers.
For those that are interested to get access to the MiniProfiler source code and want to dig more, check this page.
I hope this was useful blog post for you.
Regards,
Hajan
Similar readings


